Gameplan - Responsive Multi-Purposes Wordpress Theme
The Documentation
- Created: October 22nd 2013
- Latest Update: September 26th 2014
- By: CactusThemes
- http://themeforest.net/user/cactusthemes
- Email: [email protected]
For support please checkout CACTUSTHEME SUPPORT FORUM
Install and Update
Always remember to download the latest version from your ThemeForest account. The Installable Wordpress Themes is just the installable Wordpress theme files. The Main Files includes these following files and folders:
- Documentation Folder - contains this document and other materials
- Installation Files Folder - contains all installable files, including theme & plugins
- theme/wp-theme-gameplan.zip - GamePlan theme
- plugins/plg-gameplan-shortcodes.zip - A plugin which contains all shortcodes for theme. It contains Visual Composer plugin which helps you visually build pages
- plugins/plg-gameplan-portfolio.zip - A plugin which enables Portfolio feature for theme
- plugins/plg-gameplan-tribe-addons.zip - A addon plugin which works with The Event Calendar and Event Calendar Pro (highly recommended). You must install The Event Calendar plugin first before install this addon. Choose to install one (and only one) between GamePlan Event and GamePlan Tribe Addon (more features)
- plugins/plg-gameplan-member.zip - A plugin which enables Member feature for theme
- plugins/plg-revslider.zip - The amazing Revolution Slider which creates beautiful image sliders for your website.
- plugins/plg-js_composer.zip - Visual Composer plugin
- Sample Data Folder - contains sample data files
- gameplan-data.xml All posts, pages, menus data
- gameplan-data.xml.gz Zip file of gameplan-data.xml
- theme-options.txt Sample Theme Options Settings
- widget_data.json Widget Settings
- revslider-home-demo.zip Sample Revolution Slider
- w3-total-cache-settings.php Settings for W3 Total Cache Plugin
- Backup
- plugins/plg-gameplan-event.zip - A plugin which enables Event feature for theme. This plugin will not be supported anymore. Please use The Events Calendar and Gameplan Tribe Addons instead.

- Custom Sidebar - Allows to create your own widgetized areas and custom sidebars, and select what sidebars to use for each post or page.
- The Events Calendar - Free but awesome Event Management plugin (highly recommended if you want an event site.
- Contact Form 7 - Simple but flexible contact form plugin
- Black Studio TinyMCE Widget - A WYSIWYG widget
- TinyMCE Advanced - Enables advanced features and plugins in TinyMCE, the visual editor in WordPress
- WP PageNavi - Adds a more advanced paging navigation to your WordPress blog. This is required if you choose in Theme Options > Blog > Pagination > Use WP-PageNavi plugin
- Flickr Badges Widget - Display latest Flickr submissions in your sidebar
- W3 Total Cache - A popular caching plugin for Wordpress to improve the speed and user experience of your site
Update GamePlan
- 1. Deactive current theme by going to Appearance > Themes and activate any other themes such as the default Wordpress 3.6 's Twenty Eleven.
- 2. Delete older version by clicking on Delete link. Confirm to delete.
- 3. Update and re-install new version.
Install Sample Data
One Click Install
- Step 1. Make sure you have installed all recommended plugins. You should see Gameplan Sample Data in this list
- Step 2. Go to Tools > Demo Content Install to proceed instaling demo. Click and confirm to install. Note: This process may take several minutes due to large data and hosting settings. If your server setting "Max Execution Time" is too low, increase it at least 600s. Please do not close the browser until it finishes. If it fails, you can run this process again until seeing the Success message


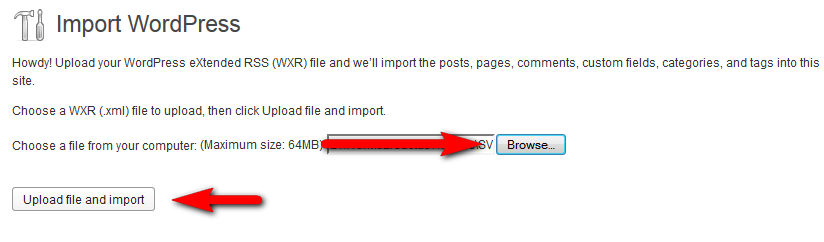
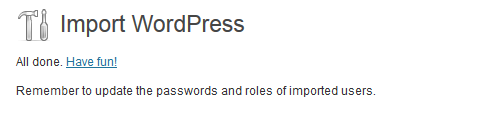
Manually Import
- gameplan-data.xml All posts, pages, menus data
- gameplan-data.xml.gz Zip file of gameplan-data.xml
- theme-options.txt Sample Theme Options Settings
- widget_data.json Widget Settings
- revslider-home-demo.zip Sample Revolution Slider


Theme Options

Shortcodes & Visual Composer


Using Of Shortcodes
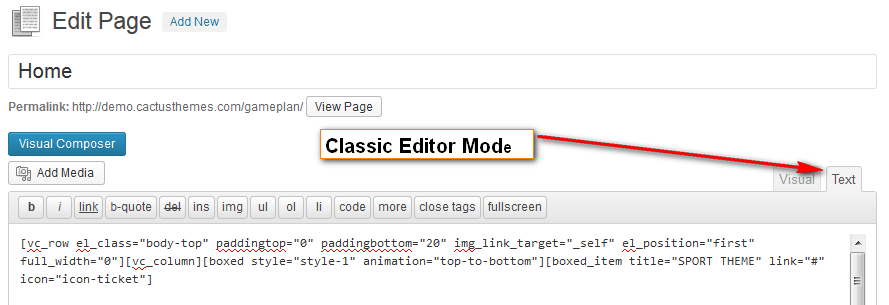
Checklist can be added using classic editor (OR you can add a text box shortcode to a row by using Visual Composer)
Step 1: In classic editor panel, use checklist button to add checklist shortcode. There are 2 types of checklist shortcode for you. (See image bellow)

After step 1, you will have the code for checklist as
Step 2: Add Content by using ul tag (see image bellow)

Compare table can be added using classic editor (OR you can add a text box shortcode to a row by using Visual Composer)
Step 1: In classic editor panel, use compare table button to add checklist shortcode. There are 2 styles of compare table for you. (See image bellow)

Step 2: Adding content
Here is some note for you:
- In column, the code
class="tb-left"indicate that this is a column located on the left of the highlighted column. - In column, the code
class="tb-center"indicate that this is a highlited column. - In column, the code
class="tb-right"indicate that this is a column located on the right of the highlighted column. - Use
class="tb-left"for all column if there is no highlighted column. - In row, the code
class="hight-light"indicate that this is the highlited row. - You can add images into table.
Theme Layout

- If there is no widget in sidebar, that sidebar position will be hidden
- Navigation sidebar is optional, use it only when you want to replace default Wordpress Menu by a third-party menu widget
- Main Sidebar only appears when a page layout is set to Sidebar Left or Sidebar Right (Layout can be set in Theme Options > Single Page or in a page when you Add New Pages & Posts). Main Sidebar can be replaced by diffent sidebars in specific pages, see Useful Tips > 3. Different Widgets for different Pages
- Use Visual Composer to build more complex page layout. Check our Sample HomePages
- Create Custom Sidebar if you want to have more position to add widgets. Go to Appearance > Sidebars to do that. After created, go to Apperance > Widgets to drag widgets to sidebar. To display custom sidebars, use Widgetised Sidebar element (in Visual Composer mode)

Setting Menu


To have multiple columns for dropdown menu
Add multi-cols columns-2 for 2 columns or multi-cols columns-3 for 3 columns in CSS Classes field of parent menu items.

Setting HomePage & Blog


If you do not see Discussion box, click on Screen Options grips on top of page and check Discussion


To set up blog, follow the steps below
If there is any widget in Blog Sidebar, it will be used in stead of Main Sidebar
Add New Pages & Posts


Page Attributes
Choose Page Template for this Page. There are 4 templates available- Default Template Page will have the same layout which is set in Appearance > Theme Options > Single Page
- Front Page Page will have layout of Home Page
- Full Width (no-sidebar) Page will be full width. There is no column for sidebar
- Left Sidebar Page will have left sidebar column (ratio 3:9). Go to Appearance > Widgets and drag widgets to Main Sidebar
Page Settings
- Page Sub-Heading Set text as sub-heading. Main heading is title of page
- Background Set background for page header. It can be either color or image
- Header Height Set height of page header (in pixels)
- Show/hide social sharing Show or hide social buttons
- Revolution Slider Name Alias Name of Revolution Slider if this Front Page template is chosen
Post Format
GamePlan only supports Default & Gallery Post FormatPost Settings
- Sticky Tag Set text as sub-heading. Main heading is title of page
- Background Set background for page header. It can be either color or image
- Header Height Set height of page header (in pixels)
- Show/hide social sharing Show or hide social buttons
- Single Post Layout By default, it follows settings in Appearance > Theme Options > Single Post
Sample HomePages
- Before continuing, go to Revolution Slider and create a new slider with Alias Name home (see Setting HomePage & Blog section)
- Go to OptionTree > Settings > Import and import /Sample Data/gameplan-themeoptions-settings.txt to have demo settings
- All images and background images have been replaced to solid color due to copyright issues. Upload and use your own images after building pages.
-
Using Row Background & Padding
Row (Visual Composer mode) is the most common element you will use when editing a page or post. In GamePlan, Row has been extended to have more properties than default version in Visual Composer. Click on the Pencil icon (as seen in the right figure) to open Row Properties form.- Background Image Upload new image or choose from your media library to set up background for Row.
- Background Color Choose background color for Row.
- Padding Top Set Top Padding for Row. Default is 30px
- Padding Bottom Set Bottom Padding for Row. Default is 30px
- Full width If choose Yes, Padding Left and Right will be set to 0
Using Padding shortcode to create horizontal space
Padding shortcode is an empty content shortcode which does one thing: set margin top and bottom to create space between elements before and after it. Padding shortcode can be found in both Classic Editor and Visual Composer mode
Different Widgets for different Pages
This theme has prepared several sidebars for using in different pages.
Go to Appearance > Widgets
- Main Sidebar - Used by every pages has Left Sidebar or Right Sidebar layout.
- Single Blog Sidebar - Used by single post pages. If there are no widgets, Main Sidebar will be used.
- Single Event Sidebar - Used by single event pages. If there are no widgets, Main Sidebar will be used.
- Blog Sidebar - Used by blog page. If there are no widgets, Main Sidebar will be used.
- Event Listing Sidebar - Used by event listing page. If there are no widgets, Main Sidebar will be used.
- Top Menu Sidebar - Used in Top Menu position (see Theme Layout).
- Search Sidebar - Used in Search position (see Theme Layout).
- Navigation Sidebar - Used in Navigation position (see Theme Layout). This position will be helpful if you want to use a third-party navigation widget. Widget in this position will be loaded instead of menu
- Main Top Sidebar - Used in Main Top position (see Theme Layout). This position is used only in Home Page and when Appearance > Theme Options > Home Page Settings > Use Slider is set to No Slider
- Body Bottom Sidebar - Used in Body Bottom position (see Theme Layout).
- Main Bottom Sidebar - Used in Main Bottom position (see Theme Layout).
- Copyright Sidebar - Used in Copyright position (see Theme Layout).
Custom Sidebar - Unique sidebar for a specific page
If you want a specific page to have unique sidebar (different from other pages), follow these steps:
- Install Custom Sidebar (free) plugin
- Go to Appearance > Custom Sidebars to create new sidebar
- Go to Pages > edit page, enter name of sidebar you created in previous step in Custom Sidebar field of Page Settings
- Go to Appearance > Widgets and drag widgets to that sidebar
Configure Search Page
Create a page named Search and configure layout for this page (see FAQ Custom Sidebar - Unique sidebar for a specific page). Then go to Appearance > Theme Options > Search and choose the page created before.Configure Event Page
- Create new page and named, for example, "Events"
- Go to Appearance > Theme Options > Events and choose "Event Listing Page" to created page in previous step
- In the same setting page, choose "Listing Style", "Page Layout" and other settings
Portfolio
Use [portfolio] shortcode in Classic Editor or Visual Composer mode. Default settings for this shortcode is configured in Appearance > Theme Options > Portfolios. Default Settings can be overriden in each shortcode use.Change URL/Slug for Portfolio and Event
URL to a single Event will be like this /event/your-event-name. URL to a single Portfolio will be like this /portfolio/your-portfolio-title.
To change the word event and portfolio in the URL, go to Appearance > Theme Options > Portfolios or Appearance > Theme Options > Events and enter "Custom Slug" for them.Easter Egg - Custom Variation for Widget
If you want to setup special style for a specific widget, use Custom Variation field to add CSS Class to widgets, then write your custom CSS code somewhere else, for example in style.css or in Appearance > Theme Options > General > Advance Code text field.
There are some pre-defined CSS class you can use to style your widgets.
- no-title - Hidetitle
- dotted-style - Use dotted-line style for widget title
- firstword - First word in widget title will be wrap by a <span> tag and has different color
- icon-[fontawesome-icon-name] - Add a fontawesome icon in widget title
Improve Site Performance
We recommend using W3 Total Cache plugin to improve your site performance. It's totally free and super awesome. Your site performance can be increased by 30-50% with this plugin. We have configured something for this plugin. If you would like, use Performance > General Settings > Import/Export Settings, import the settings file included in the package at /Sample Data/w3-total-cache-settings.php- Download and install this tool POEdit
- Open POEdit and load [/gameplan/languages/gameplan.po]
- Translate the text and save the file
- A file named gameplan.mo is created. Rename it with Code Name of your language. For example, de_DE.mo for German - Deutsche. See language code list here http://codex.wordpress.org/WordPress_in_Your_Language
- Open [{wordpress root}/wp_config.php] and find this line define('WPLANG', '');. Change it with your language code, for example define('WPLANG', 'de_DE');
- Revolution Slider (Extended License) - http://codecanyon.net/item/slider-revolution-responsive-wordpress-plugin/2751380
- Isotope (Developer License) - http://isotope.metafizzy.co
- Visual Composer (Extended License) - http://codecanyon.net/item/visual-composer-for-wordpress/242431
- Option Tree (GPL2 License) by Derek Herman - http://wp.envato.com
- FlexSlider (GPL2 License) by WooThemes - http://flexslider.woothemes.com/
- BookBlock by Pedro Botelho - http://tympanus.net/codrops/2012/09/03/bookblock-a-content-flip-plugin/
- BootStrap (Apache License v2.0) - http://twitter.github.io/bootstrap/
- Font Awesome (GPL License) by Dave Gandy - http://fontawesome.io
- Mobile Detect (MIT License) by Serban Ghita
- Custom Sidebar (GPL2 License) by Javier Marquez - http://marquex.es/698/custom-sidebars-1-00
- jQuery Easing (BSD License) - http://gsgd.co.uk/sandbox/jquery/easing/
- jQuery Modernizr (MIT & BSD License) - http://modernizr.com
- Pretty Photo by Stephane Caron - http://www.no-margin-for-errors.com
- jQuery carouFredSel by Fred Heusschen - www.frebsite.nl
- jquery.hoverdir.js - http://www.codrops.com
- jQuery Scrollbox by Hunter Wu - http://github.com/wmh/jquery-scrollbox
- Justin Kimbrell by Objective HTML, LLC
Home Page
Home Page v2
Home Page v3
Home Page v4
Home Page Light Version
FAQs & Other Configs
More FAQs can be found here http://cactusthemes.ticksy.com/faqs/


Translation & RTL
Licenses
Used Assets
The list might not be complete by accident. Authors who think you owe a license in this theme, please contact us at [email protected]
Support
If you face problems with the installation or customization of our product please do not hesitate to contact us via our support ticket system: